Deploy Citrix ingress controller in an Azure Kubernetes Service cluster with Citrix ADC VPX
This topic explains how to deploy the Citrix ingress controller with Citrix ADC VPX in an Azure Kubernetes Service (AKS) cluster. You can also configure the Kubernetes cluster on Azure VMs and then deploy the Citrix ingress controller with Citrix ADC VPX.
The procedure to deploy for both AKS and Azure VM is the same. However, if you are configuring Kubernetes on Azure VMs you need to deploy the CNI plug-in for the Kubernetes cluster.
Prerequisites
You should complete the following tasks before performing the steps in the procedure.
- Ensure that you have a Kubernetes cluster up and running.
Note
For more information on creating a Kubernetes cluster in AKS, see Guide to create an AKS cluster.
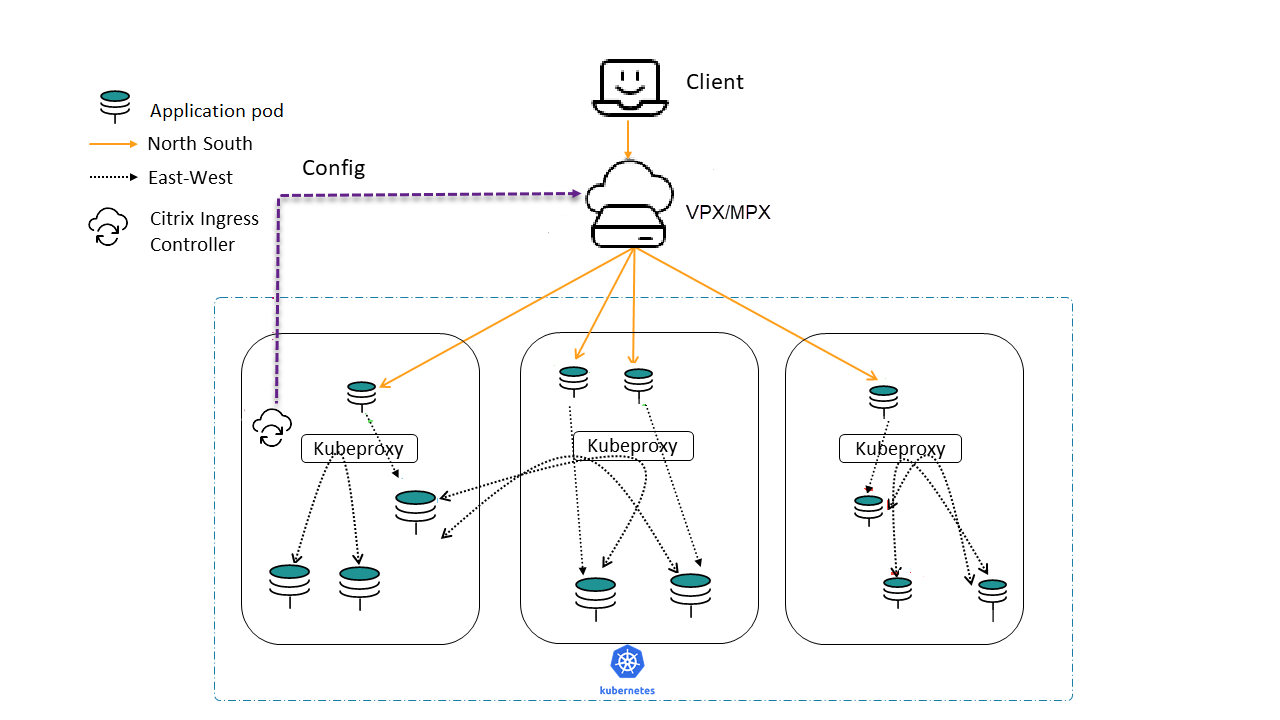
Topology
The following is the sample topology used in this deployment.
Get a Citrix ADC VPX instance from Azure Marketplace
You can create Citrix ADC VPX from the Azure Marketplace. For more information on how to create a Citrix ADC VPX instance from Azure Marketplace, see Get Citrix ADC VPX from Azure Marketplace.
Get the Citrix ingress controller from Azure Marketplace
To deploy the Citrix ingress controller, an image registry should be created on Azure and the corresponding image URL should be used to fetch the Citrix ingress controller image.
For more information on how to create a registry and get the image URL, see Get Citrix ingress controller from Azure Marketplace.
Once a registry is created, the Citrix ingress controller registry name should be attached to the AKS cluster used for deployment.
az aks update -n <cluster-name> -g <resource-group-where-aks-deployed> --attach-acr <cic-registry>
Deploy Citrix Ingress Controller
Perform the following steps to deploy the Citrix ingress controller.
- Create Citrix ADC VPX login credentials using Kubernetes secret.
kubectl create secret generic nslogin --from-literal=username='<azure-vpx-instance-username>' --from-literal=password='<azure-vpx-instance-password>'
Note: The Citrix ADC VPX user name and password should be the same as the credentials set while creating Citrix ADC VPX on Azure.
-
Using SSH, configure a SNIP in the Citrix ADC VPX, which is the secondary IP address of the Citrix ADC VPX. This step is required for the Citrix ADC to interact with pods inside the Kubernetes cluster.
add ns ip <snip-vpx-instance-private-ip> <vpx-instance-primary-ip-subnet> -
snip-vpx-instance-private-ipis the dynamic private IP address assigned while adding a SNIP during the Citrix ADC VPX instance creation. -
vpx-instance-primary-ip-subnetis the subnet of the primary private IP address of the Citrix ADC VPX instance.To verify the subnet of the private IP address, SSH into the Citrix ADC VPX instance and use the following command.
show ip <primary-private-ip-addess> -
Update the Citrix ADC VPX image URL, management IP, and VIP in the Citrix ingress controller YAML file.
-
Download the Citrix ingress controller YAML file.
wget https://raw.githubusercontent.com/citrix/citrix-k8s-ingress-controller/master/deployment/azure/manifest/azurecic/cic.yamlNote: If you do not have
wgetinstalled, you can use thefetchorcurlcommand. -
Update the Citrix ingress controller image with the Azure image URL in the
cic.yamlfile.- name: cic-k8s-ingress-controller # CIC Image from Azure image: "<azure-cic-image-url>" -
Update the primary IP address of the Citrix ADC VPX in the
cic.yamlin the following field with the primary private IP address of the Azure VPX instance.# Set NetScaler NSIP/SNIP, SNIP in case of HA (mgmt has to be enabled) - name: "NS_IP" value: "X.X.X.X"- Update the Citrix ADC VPX VIP in the
cic.yamlin the following field with the private IP address of the VIP assigned during VPX Azure instance creation.# Set NetScaler VIP for the data traffic - name: "NS_VIP" value: "X.X.X.X"
- Update the Citrix ADC VPX VIP in the
-
Once you have configured the Citrix ingress controller with the required values, deploy the Citrix ingress controller using the following command.
kubectl create -f cic.yaml
Verify the deployment using a sample application
-
Deploy the required application in your Kubernetes cluster and expose it as a service in your cluster using the following command.
kubectl create -f https://raw.githubusercontent.com/citrix/citrix-k8s-ingress-controller/master/deployment/azure/manifest/azurecic/apache.yaml -
Create the Ingress resource using the following command.
kubectl create -f https://raw.githubusercontent.com/citrix/citrix-k8s-ingress-controller/master/deployment/azure/manifest/azurecic/ingress.yaml -
To validate your deployment, use the following command.
$ curl --resolve citrix-ingress.com:80:<Public-ip-address-of-VIP> http://citrix-ingress.com
<html><body><h1>It works!</h1></body></html>
The response is received from the sample microservice (Apache) which is inside the Kubernetes cluster. Citrix ADC VPX has load-balanced the request.